Server
Overview
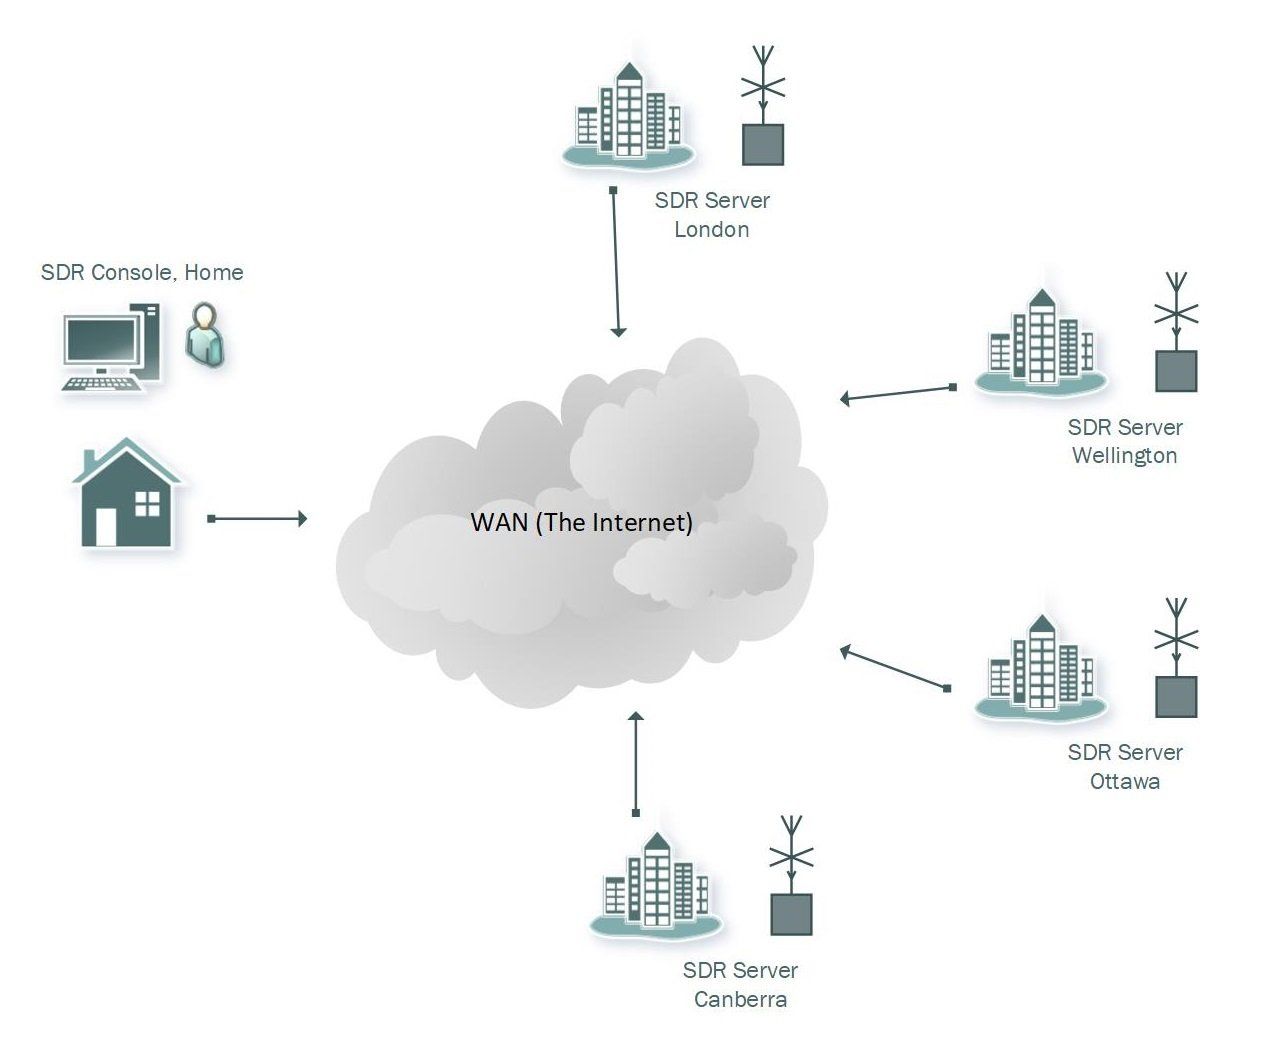
SDR Server supports one or more SDR radios located at a remote site, internet is used to connect the SDR Console to the server. Use the Server Manager to configure and start the server (runs as a Windows service). The server also supports up to ten simultaneous connections (one radio per user), so the practical limit is your internet upload bandwidth.
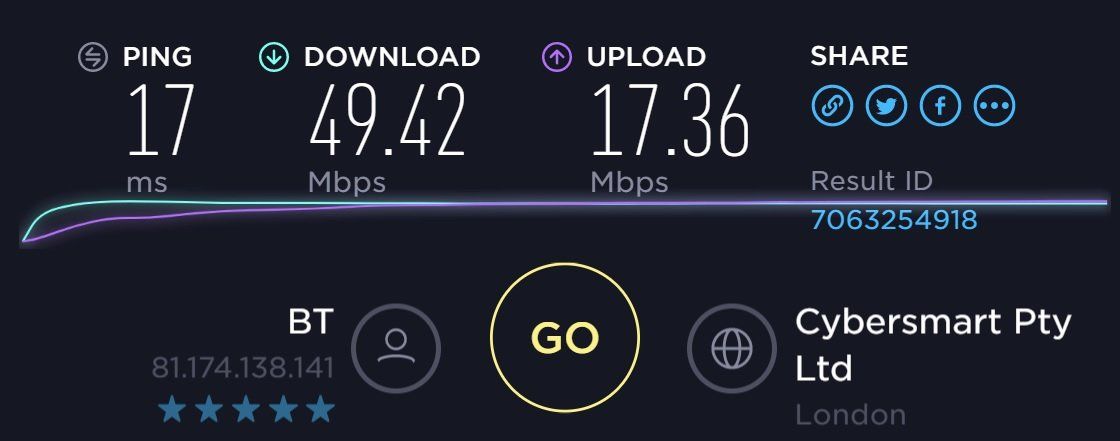
To determine your upload bandwidth use one of the many websites such as http://www.speedtest.net which will gives results such as shown here.
The server does not require a high-end computer - tests have successfully concluded on a 32-bit Windows 7 laptop with a 2GHz Core2Duo processor, the CPU load typically less than 2%.
The server sends IQ data (In-phase and Quadrature), this is the same data your SDR radio creates so you are effectively running a SDR radio with the internet between. By sending over IQ data you lose none of the features available when the radio is connected to your local computer.
See also Console Streaming , connect your PC to the data output from SDR Console running on another PC. ⚠️ The server does not support transmit, this is not planned.
Speedtest
Connecting
Just follow these steps to connect to a remote server.
- Add a definition
- Connect to the server
- Start the radio
- Options - connection configuration
1. Add Definition
To connect to a server you must first add a server definition:
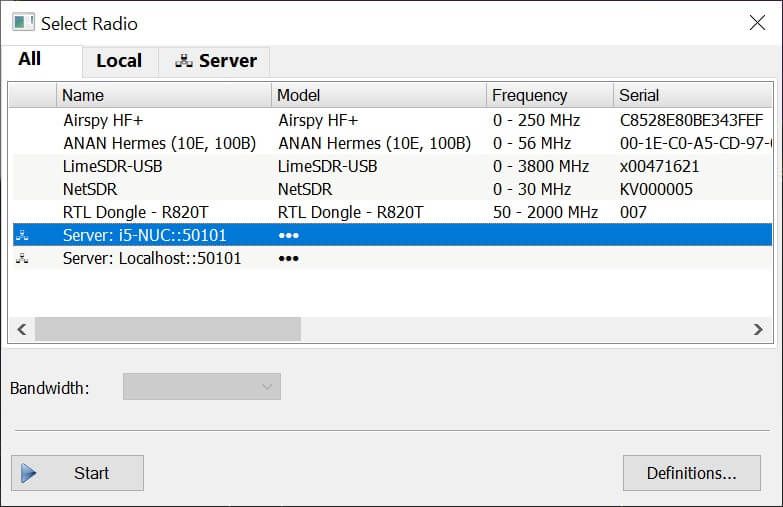
- From the ribbon bar select Home, Radio, Select Radio.
- In the Select Radio window click Definitions...
- In the Radio Definitions window select V3 Server at the bottom of the Search list.
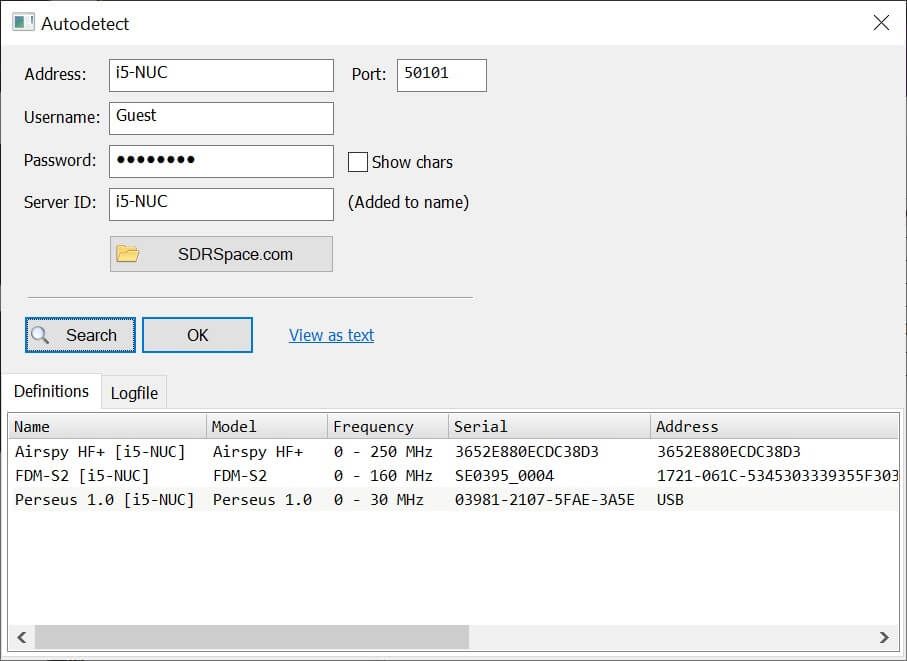
- The Autodetect window is displayed.
- Either:
- Enter the Address, Username and Password, then press Select, or
- Select a worldwide server from the SDRSpace.com list.
- If the server can be contacted a list of radios is displayed.
- Now press OK.
- A new entry is added to the Radio Definitions window.
Antivirus
Remote servers may be blocked by antivirus software!
2. Connect
To connect to a radio simply select the entry in the Radio Definitions windows and press Start.
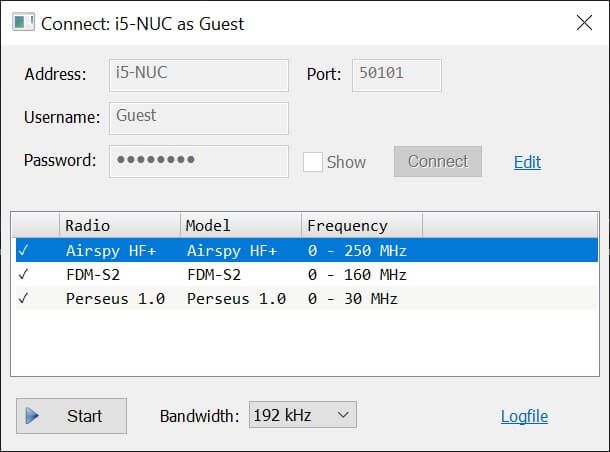
3. Start
A new window is displayed with a list of the radios on the server and the current status, if the server owner adds or removes radios what you see is always the current status.
Select:
- An available radio,
- The bandwidth, and
- Press Start.
4. Options
When you connect to a remote server the console's ribbon bar is updated - entries are added for the remote radio and also the general server options. The Server Options is the right-most entry in the Radio panel.
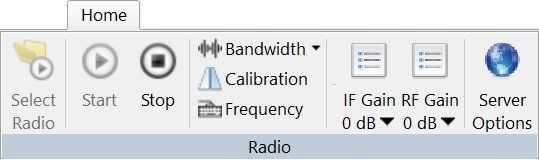
Server Options
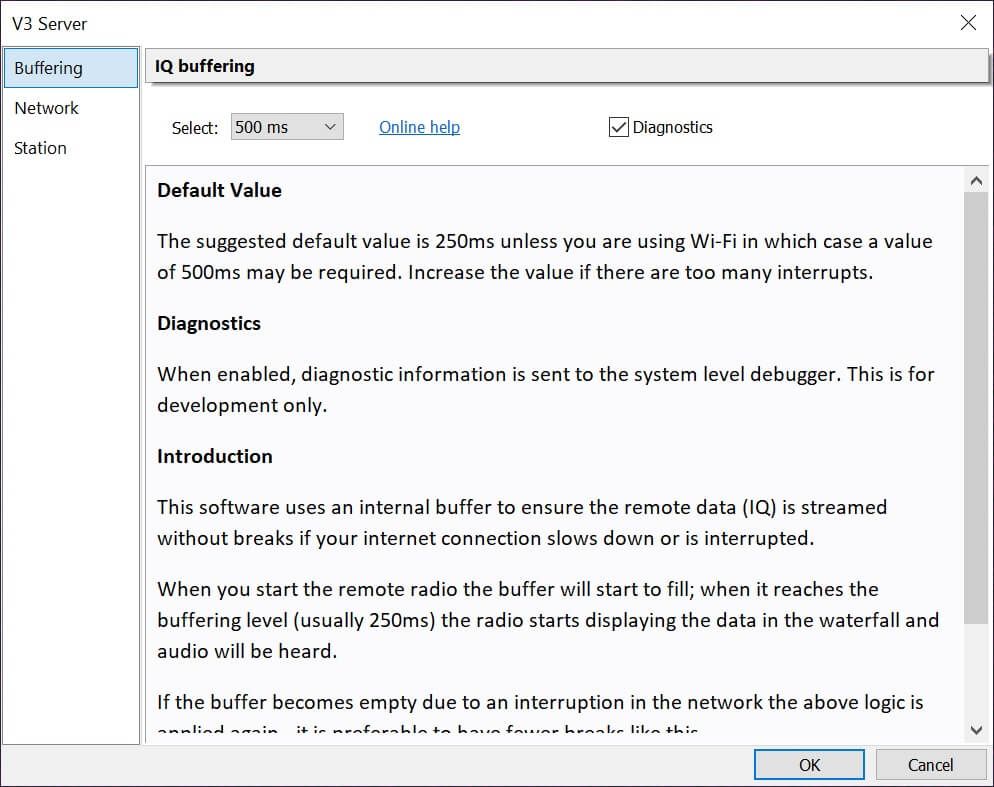
IQ Buffering
This software uses an internal buffer to ensure the remote data (IQ) is streamed without breaks if your internet connection slows down or is interrupted.
When you start the remote radio the buffer will start to fill; when it reaches the buffering level (usually 250ms) the radio starts displaying the data in the waterfall and audio will be heard.
If the buffer becomes empty due to an interruption in the network the above logic is applied again - it is preferable to have fewer breaks like this.
If using a wired connection you can probably drop the buffering down to 100ms if a lower latency is important.
Network
👌 If TCP works for you then do not enable UDP.
The default protocol is TCP, only use UDP in very challenging situations where TCP cannot stream smoothly, for example when there is a lot of audio stutter or the waterfall does not stream smoothly. These problems are usually caused by wireless links, either a link to a remote location where the SDR is located or a Wi-Fi link to the computer where the console is running.
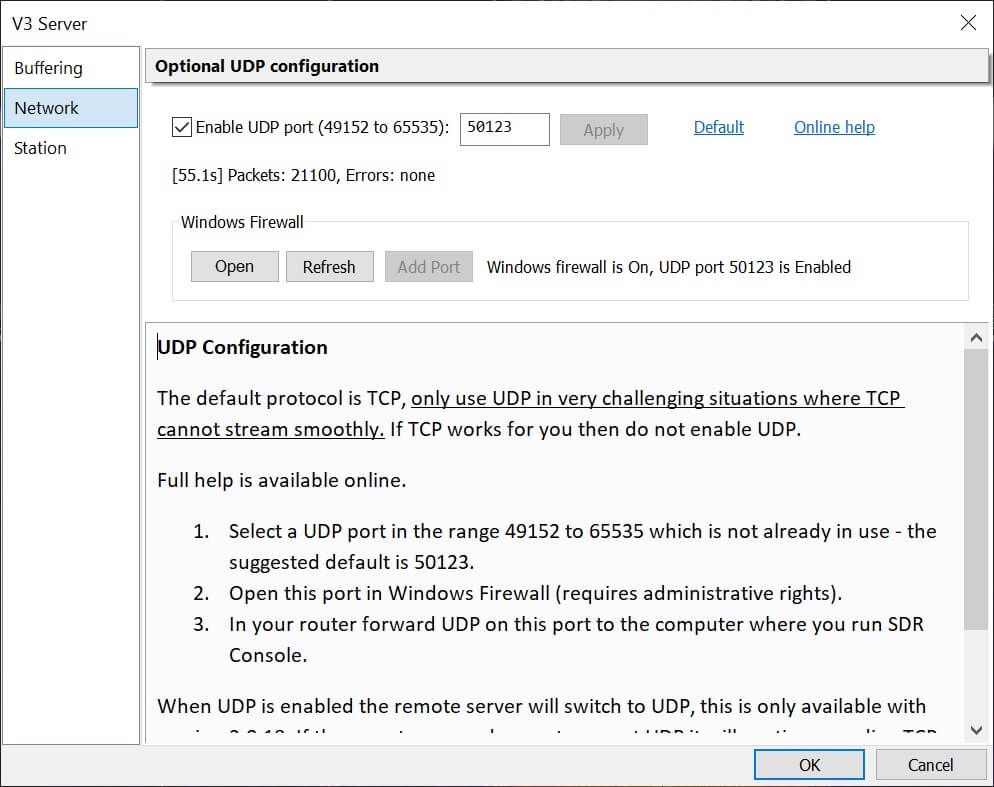
When UDP is enabled the remote server will switch to UDP, this is only available with version 3.0.18. If the remote server does not support UDP it will continue sending TCP. If you do not receive data when UDP is enabled then either:
- The Windows Firewall is not correctly configured, or
- UDP packets are not being forwarded through your router to this program.
- Select a UDP port in the range 49152 to 65535 which is not already in use - the suggested default is 50123.
- Open this port in Windows Firewall (requires administrative rights).
- In your router forward UDP on this port to the computer where you run SDR Console.
If UDP is active then statistics are shown:
- UDP connection time in seconds
- Packets received
- Errors:
- None, or
- Blocked (not from the server's IP), incorrect checksum, invalid header, out of sequence, incorrect size.
UDP Port
It is recommended that you use a port number reserved for dynamic / private use [Wikipedia].
Windows Firewall
By default incoming UDP data will be blocked, so you must add a Windows Firewall rule which allows incoming UDP data on the port selected above.
- Start SDR Console as Administrator - this grants the process elevated rights.
- Click the Add Port button.
Alternatively see this Microsoft article [link].
Router Configuration
In your router look for Port Forwarding, add an entry which forwards incoming UDP data on the selected port (50123) and forwards it to the computer where SDR Console is running. It is very strongly recommended that you assign static addresses to the computers accessing the internet via the router.
If you use SDR Console on more than one computer via the same router then you must select a unique UDP port for each computer and add a corresponding port forwarding entry.
If your IP subnet is 192.168.2.x and you have both a fixed station PC and a laptop:
| Computer | Static IP Address | Port | Rule |
|---|---|---|---|
| Station PC | 192.168.2.100 | 50123 | Forward UDP port 50123 to 192.168.2.100 |
| Laptop | 192.168.2.101 | 50124 | Forward UDP port 50124 to 192.168.2.101 |
TCP or UDP?
The connection between the Console and Remote Server uses TCP [Wikipedia] by default:
- Does not require any extra configuration on the computer running SDR Console - data is returned from the server using the connection established by the console.
- Guaranteed error-free data transfer.
- Can usually achieve reliable streaming over 'modern' wired internet installations.
TCP provides low-latency streaming over fixed (wired) networks, but not always in situations where the path has wireless elements, either point-to-point or Wi-Fi in the house. If you are unable to achieve steady streaming using TCP you can enable UDP [Wikipedia] which can be better but of course is not as reliable [GeeksforGeeks]:
- Requires router and firewall configuration to allow incoming UDP packets.
- Not error free - but usually 99% or better.
- Lower latency.
Video
Running SDR Console in Cornwall, England and connected to a remote server in New Hampshire USA. Hams rag-chewing on 75m.
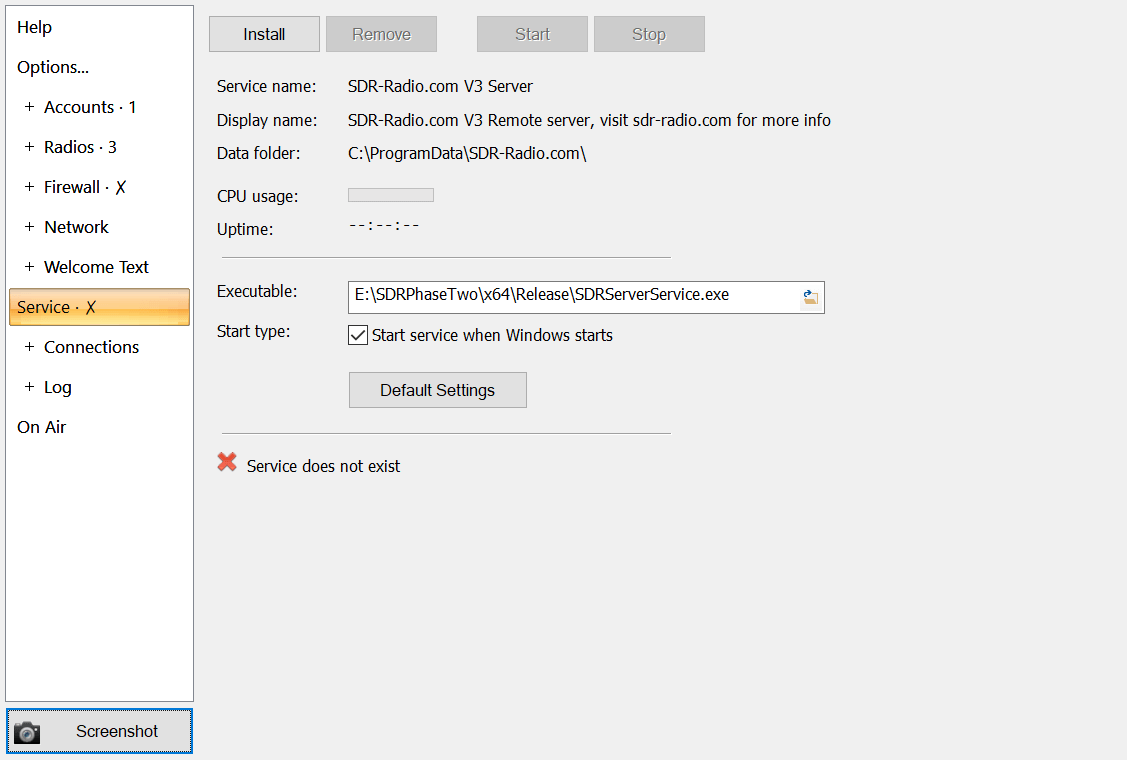
Server Manager
Use the Server Manager to configure the radios on the server. Start the Server Manager from either the Windows Start menu or the Tools pane of the Console's ribbon bar.
Click in the link below for more information about:
- Server Address (Public or Private)
- Access (Public or Private)
- Server Manager